Explore the Code
In the previous section, you created your first spore on-chain by running the spore-first-example. In this section, we'll break down the code powering the example.
The spore-first-example involves 3 steps to create a spore on-chain:
- Create a
Wallet - Construct the transaction
- Sign and send the transaction on chain
Create a Wallet
The first step in the example is to create a Wallet with the createDefaultLockWallet API:
const wallet: Wallet = createDefaultLockWallet('<prvate_key>');
The Type definition of Wallet:
import { Script, Address, HexString, Hash } from '@ckb-lumos/base';

interface Wallet {
  lock: Script;
  address: Address;
  signMessage(message: HexString): Hash;
  signTransaction(txSkeleton: helpers.TransactionSkeletonType): helpers.TransactionSkeletonType;
  signAndSendTransaction(txSkeleton: helpers.TransactionSkeletonType): Promise<Hash>;
}
In the provided example, Wallet is a simplified structure for testing Spore functionality in a Node.js environment. In a real production project, it's crucial to use a more secure structure and avoid publicizing private keys.
Wallet has two kinds of properties:
lockandaddress: these basic variables represent and identify ownership of a private key.signMessage,signTransactionandsignAndSendTransaction: these functions used to sign RawTransactions and send the signed transactions to the blockchain via RPC.
For this tutorial, we focus on the fundamentals of Wallet, and see how Wallet.lock and Wallet.address are generated in the example:
Generate Wallet.lock
Wallet.lockis a lock script, and lock script is a type ofScriptthat represents the ownership of your private key, which was generated in the previous section.Think of a
Scriptas an on-chain function call, wherelock.codeHashandlock.hashTypeindicate which function you're calling, andlock.argsrepresents the arguments you pass to this function.Explore more:
In our case, we generate CKB default lock, also known as the Secp256k1Blake160 Sign-all lock, to secure the new spore. You need to fill the lock.args with a blake160 hash generated from your private key to generate this lock script:
import { getSporeConfig } from '@sproe-sdk/core';

const config = getSporeConfig();
const Secp256k1Blake160 = config.lumos.SCRIPTS['SECP256K1_BLAKE160']!;
const lock: Script = {
  codeHash: Secp256k1Blake160.CODE_HASH,
  hashType: Secp256k1Blake160.HASH_TYPE,
  args: hd.key.privateKeyToBlake160(privateKey),
};
Generate Wallet.address
Wallet.addressis a CKB address generated fromWallet.lock. CKB address packages lock scripts into a single-line, verifiable, and easy-to-read form.Explore more: RFC-0021-ckb-address-format.
In our example, the address is generated using the helpers.encodeToAddress method from Lumos:
import { helpers } from '@ckb-lumos/lumos';

const address: string = helpers.encodeToAddress(lock, {
  config: config.lumos,
});
Construct the transaction
The key step in creating a spore on-chain is to call the createSpore API from spore-sdk, to construct a TransactionSkeleton.
Call the API in the spore-first-example as follows:
const { txSkeleton, outputIndex } = await createSpore({
  data: {
    contentType: 'image/jpeg',
    content: await fetchLocalFile('./image.jpg'),
  },
  toLock: wallet.lock,
  fromInfos: [wallet.address],
});
data: cell data specifying the immutable data of the new spore.toLock: lock script specifying the ownership of the new spore.fromInfos: to specify the transaction's sponsor addresses
We break down how to collect required props of the API, and examine how the txSkeleton is generated during the process.
Step 1: Upload a local file
In our example, we fill the props.data of the createSpore API with ./image.jpg as the content of the new spore.
Get props.data.contentType
contentType takes in a MIME Type indicating the format of the file.
Given that the file is in .jpg format, its corresponding MIME type is:
data: {
  contentType: 'image/jpeg',
    ...
},
Get props.data.content
content takes in data that has been converted into binary bytes.
In our case, we get it through Node.js's readFileSync API:
import { resolve } from 'path';
import { readFileSync } from 'fs';

async function fetchLocalFile(src: string): ArrayBuffer {
  const buffer = readFileSync(resolve(__dirname, src));
  return new Uint8Array(buffer).buffer;
}
Then fill the props.data.content with:
data: {
    ...
  content: await fetchLocalFile('./image.jpg'),
},
Step 2: Specify the owner of the new spore
In the Nervos CKB ecosystem, cells are protected by lock scripts, which determine ownership. By specifying a lock script using the toLock parameter in the createSpore API, you define who owns the new spore cell. In our example, wallet.lock is the owner.
toLock: wallet.lock
Step 3: Specify the sponsor of the transaction
To create a spore on-chain, we need a certain amount of CKBytes to:
- Reserve on-chain storage
- Cover transaction fees
You can specify one or more CKB addresses to the props.fromInfos from the createSpore API, to collect CKBytes from these addresses.
In our case, wallet.address is the sponsor of the Spore Creation transaction:
fromInfos: [wallet.address]
Step 4: Construct transaction
Now that you've collected the necessary parameters for the createSpore API—data, toLock, and fromInfos—you can call the API to construct a transaction that create a spore on-chain. Here's an outline of this process:
- Generate a new spore and add it to
Transaction.outputs - Collect CKBytes from the address specified in
fromInfos - Add relevant cell deps to
Transaction.cellDeps - Generate an ID for the new spore
- Pay the transaction fee using the CKBytes collected
- Return extra CKBytes to the sponsor address at
fromInfos[0]
const { txSkeleton, outputIndex } = await createSpore({
  data: {
    contentType: 'image/jpeg',
    content: await fetchLocalFile('./image.jpg'),
  },
  toLock: wallet.lock,
  fromInfos: [wallet.address],
});
As the result, the createSpore API returns a txSkeleton, a TransactionSkeleton object that contains all required properties of a RawTransaction.
Sign and send the transaction
Once a txSkeleton is generated and ready-to-sign, you can call the Wallet.signAndSendTransaction API to sign and send the transaction on-chain:
const hash: string = await wallet.signAndSendTransaction(txSkeleton);
This API call is divided into two essential steps:
Step 1: Sign the transaction
Signing a transaction proves its validity for the blockchain verification. In the example, we set Wallet.address as the sponsor of the transaction.
Proving transaction validation involves:
- Generate a message to be signed by
Wallet.address - Obtain a signature by signing the message with
Wallet.signMessage - Sync the obtained signature to
Transaction.witnesses
import { SporeConfig, getSporeConfig } from '@spore-sdk/core';

// Generate messages to be signed
const config: SporeConfig = getSporeConfig();
const Secp256k1Blake160 = config.lumos.SCRIPTS['SECP256K1_BLAKE160']!;
txSkeleton = secp256k1Blake160.prepareSigningEntries(txSkeleton, { config: config.lumos });

// Sign transaction messages with private key from the `wallet`
txSkeleton = wallet.signTransaction(txSkeleton);
Above is a simplified process for readability, you can refer to the actual code of the Wallet.signTransaction API for details.
For additional information about the signing process of CKB default lock addresses, see: P2PKH - How to sign transaction.
Step 2: Send the transaction
After the transaction is signed and connected to the CKB public nodes, we can send it via JSON-RPC send_transaction. Once the transaction is verified, the CKB nodes will return the hash value, meaning that the new spore is confirmed on-chain.
const rpc = new RPC(config.ckbNodeUrl);
return await rpc.sendTransaction(tx, 'passthrough');
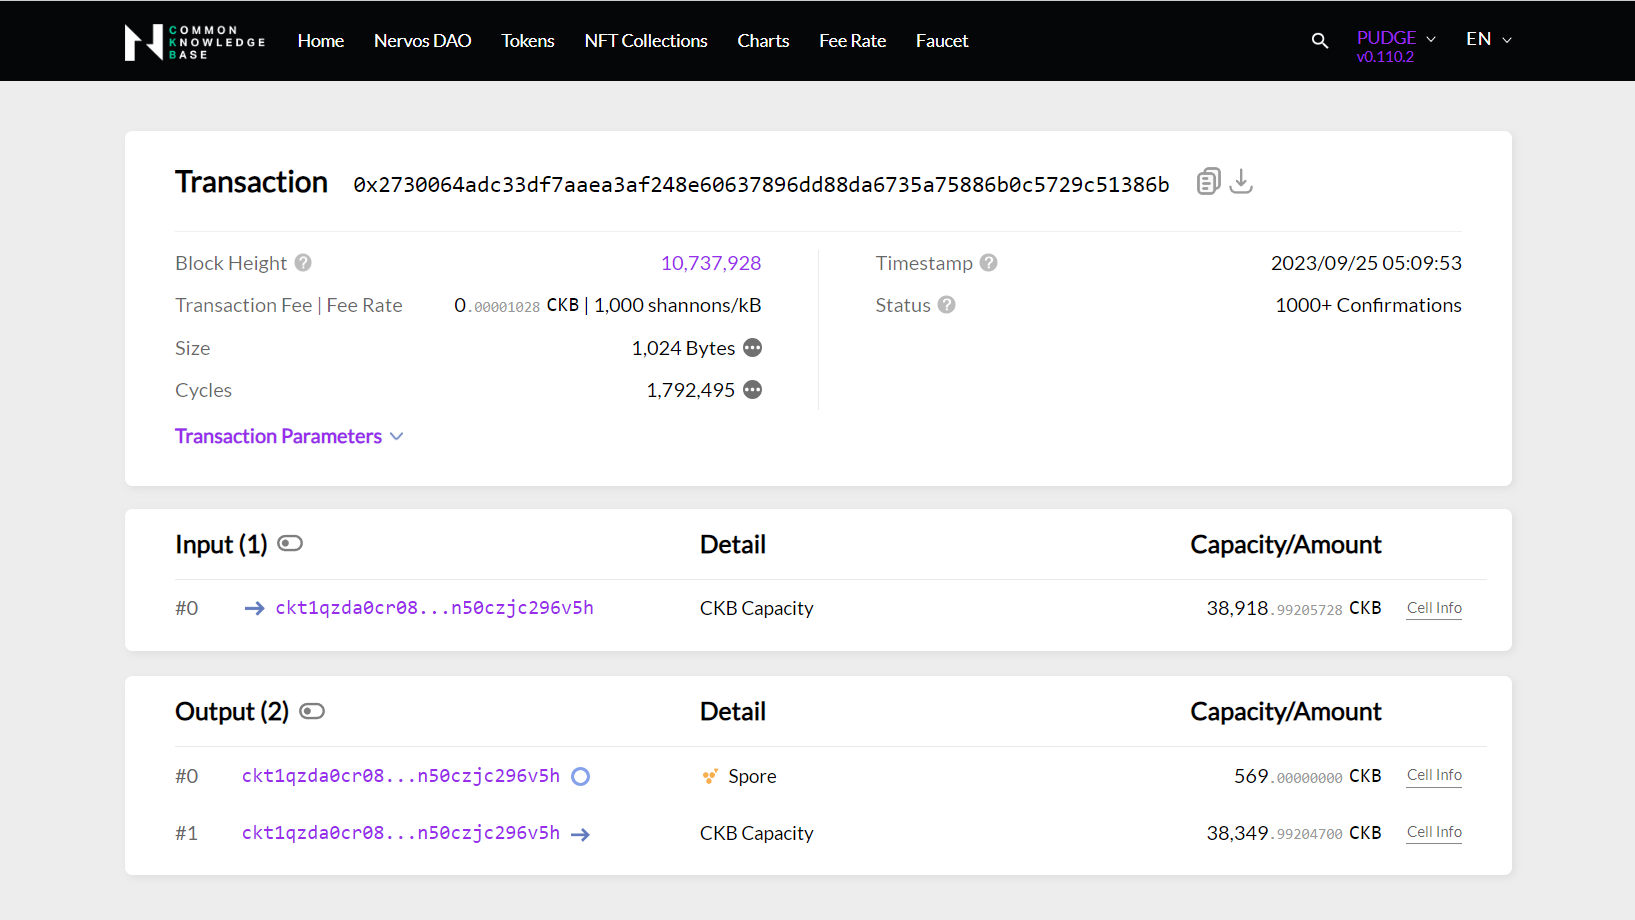
You can review this transaction on CKB Explorer by its hash as follows:
https://pudge.explorer.nervos.org/transaction/{hash}
Recap
By following this tutorial this far, you have mastered how a spore is created on-chain. Here's a quick recap:
- Create a CKB transaction containing a Spore Cell in the outputs
- Generate and sign a message to verify the transaction
- Send the transaction via RPC
Once the transaction is confirmed on-chain, the new spore is created.
In this tutorial, we demonstrated using an image as the content, but remember that Spore allows unrestricted content formats. Get creative and have fun exploring!
Additional resources for your reference:
- Signing process of
CKB default lockaddresses: P2PKH - How to sign transaction - CKB transaction structure: RFC-0022-transaction-structure
- CKB data structure basics: RFC-0019-data-structure
What's next?
For more practical recipes on how to use the Spore SDK, visit: How-to Recipes.
If you are a dapp developer, feel free to try out building an on-chain blog app with Spore: Create Simple On-Chain Blog.